Getting started
This guide takes you from zero to a working, encrypted offsite backup at GetGeek. Allow 10–15 minutes.
Your connection details
You will find them in the welcome email and under your service in the portal (portal.getgeek.se), in the Connection Information widget:
You have a dedicated datastore with us — it is not shared with any other customer, and you only pay for the space your backups actually use.
Your account is administrator of your datastore. It can create and delete namespaces, prune old backups and create API tokens. That is exactly why the password should not be stored on your Proxmox — see step 1.
The web interface
You can log in at https://sto-pbs.getgeek.se:8007 with your username
and password. Go to Datastore → <datastore> in the left-hand menu —
there you can see your backups, how much space they take and the results
of our verify jobs.
Forbidden (403), and that is normal The interface is Proxmox Backup Server's full administration view. Your account can reach your own datastore and nothing else, so pages about the server (Dashboard, Disks, Network, Shell and others) respond with permission check failed. They belong to our hardware, not to your service.
Step 1: Create an API token for your Proxmox
Your password is allowed to delete backups. Your Proxmox should not be able to: if it is hacked or hit by ransomware, the backup is the only thing that will save you, and the attacker gets access to everything stored on the server.
So give your Proxmox an API token that can only write new backups. A token can never have more privileges than your account, only fewer.
Log in to the web interface with your password, and:
-
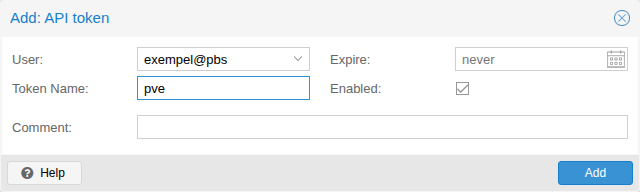
Configuration → Access Control → API Token → Add
- User:
<username>@pbs - Token Name:
pve(or any name you like) - Leave Expire empty
- User:
-
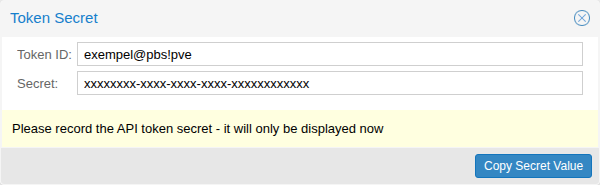
Copy the Secret straight away. It is shown only once.
-
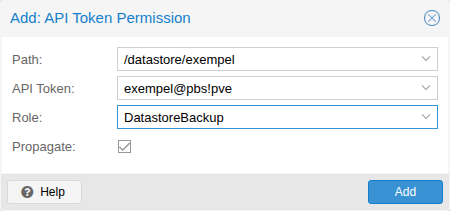
Configuration → Access Control → Permissions → Add → API Token Permission
- Path:
/datastore/<datastore> - API Token:
<username>@pbs!pve - Role:
DatastoreBackup - Propagate: checked
- Path:
The screenshots show an example account called exempel. You will see
your own username and datastore.
DatastoreBackup and nothing else
That role can create new backups and read back its own, but cannot delete
anything. That is the whole point of the token.
The permission takes effect after a few seconds. If you get permission check failed immediately afterwards: wait a moment and try again.
Step 2: Add the storage in Proxmox VE
In the Proxmox VE interface: Datacenter → Storage → Add → Proxmox Backup Server and fill in:
- ID: any name, e.g.
getgeek-backup - Server:
sto-pbs.getgeek.se - Username:
<username>@pbs!pve(the token, not the user) - Password: the token's secret from step 1
- Datastore:
<datastore> - Namespace: leave empty, or enter a namespace (see below)
- Fingerprint: paste the fingerprint from the portal's Connection Information widget
- Encryption Key: enable it and choose Auto-generate a client encryption key
Encryption is enabled by default in this guide — we strongly recommend that you do not skip that step. See Encryption & key for what the key means and why it must be backed up straight away.
If you prefer the CLI on your PVE node, that works just as well:
As soon as the storage has been added — back up the key file
(/etc/pve/priv/storage/<id>.enc) to a password manager or a printout in
a safe, before you run the first backup. Read
Encryption & key for details.
Namespaces
Namespaces let you divide the datastore into folders, for example one per cluster, customer or environment. Backups in different namespaces are shown separately.
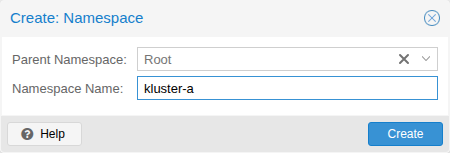
Create them in the web interface, logged in with your password:
Datastore → <datastore> → Content → Add Namespace. The token can back
up into any namespace you have created, but cannot create or delete any
itself.
Then point your Proxmox at a namespace with the Namespace field in the
storage settings, or --namespace <name> to pvesm. If you want to back
up different clusters to different namespaces, add one storage per
namespace.
Move existing backups to a namespace
You do not need to redo your backups. Logged in with your password:
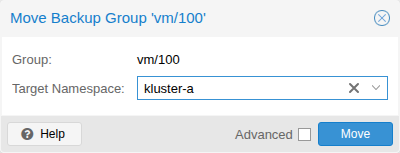
Datastore → <datastore> → Content. Click the move icon (four
arrows) in the Actions column on the group's row, for example
vm/100:

Choose the namespace under Target Namespace and click Move. The whole group comes along, with all snapshots, and can be restored as usual afterwards.
Do it like this to avoid duplicates:
- Move when no backup job is running against the group.
- Immediately afterwards, change Namespace on your storage in Proxmox to the new namespace. Otherwise the next backup ends up in a new group in the root, and the first backup there will be a full backup.
The token cannot move anything. That requires your password account.
Step 3: Create the backup job
Datacenter → Backup → Add:
- Storage: your new storage, e.g.
getgeek-backup - Schedule: e.g. every night at 01:00
- Selection: the VMs/containers to protect
- Mode: Snapshot (no downtime for the guest)
Retention is handled on the server side by us, using the default values described in Retention & schedules.
Good to know about the first backup: it is a full backup and can take hours depending on the amount of data and your connection. All following backups are incremental and deduplicated — usually much faster.
Step 4: Test a restore (do it now, not when things are on fire)
- Choose a small VM under your PVE → getgeek-backup → Backups.
- Click Restore and restore to a new VM ID (this does not overwrite the original).
- Start the restored machine and verify that it works.
- Delete the test copy when you are done.
Repeat the test at regular intervals. See FAQ for how often we recommend it and why.
Do you already have your own Proxmox Backup Server?
Then you can instead let your PBS send its backups to us with a push sync job — the offsite copy that the 3-2-1 rule requires, without changing anything in your existing backup routine in PVE. Step by step, with encryption and screenshots: Sync from your own PBS.
Support
Questions or problems? Email hej@getgeek.se — the same engineers who run the platform will answer.